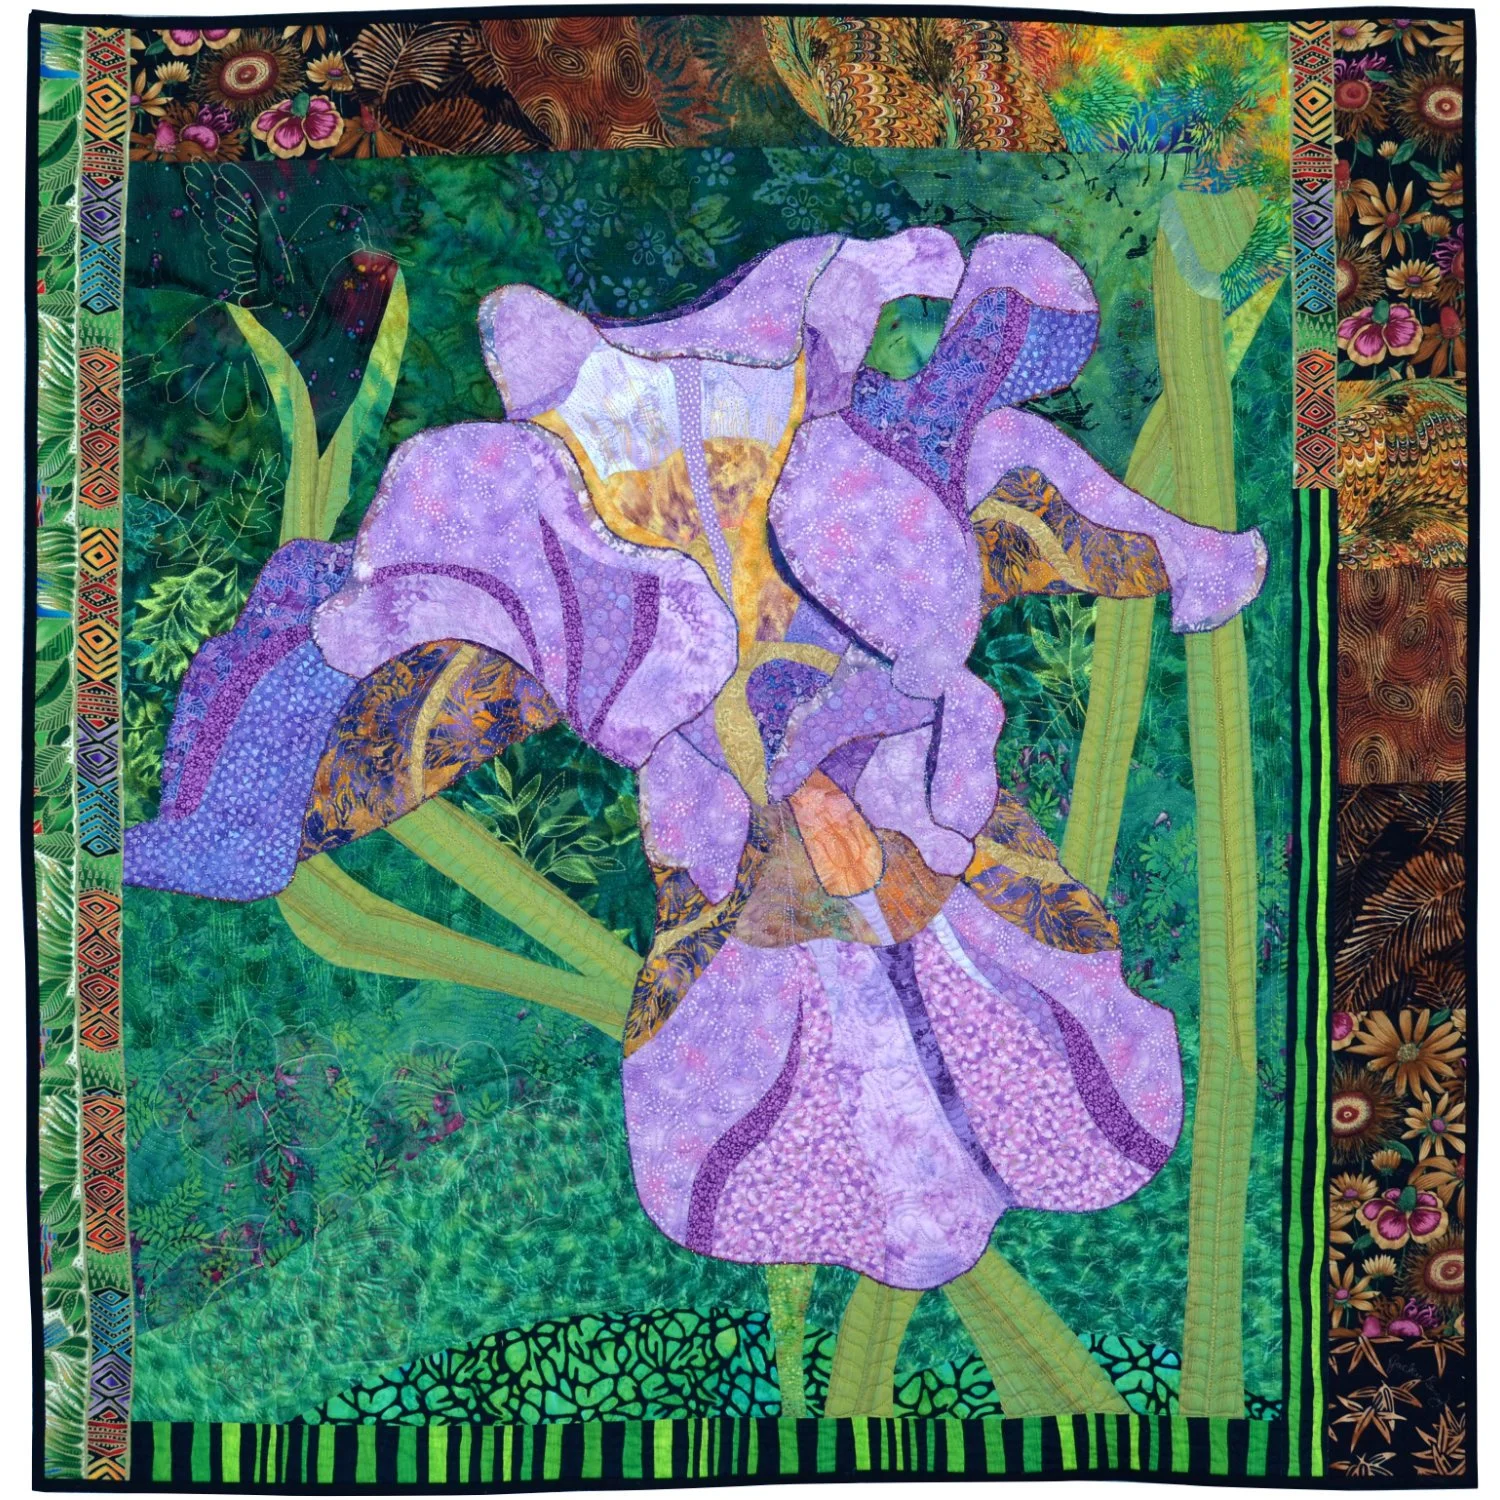
Lovely Lavender Iris
Designed and quilted by Jackie Berry
Made in Workshop with Ruth McDowell
Completed top May, 2006
Finished in August, 2014
45.5” width x 45.5” length


I have always admired Ruth McDowell…

I have several of her books….

….on piecing nature.

Before the workshop, I researched my photos…..

…to find a flower to make a pattern…

…prior to the workshop.

And settled on this iris..

I made a pattern and took it with me..

I made a sewing order on my master drawing.

We had to make a listing of our sewing order.

Then pick fabrics

Ruth McDowell pictured with me.

Finished and juried into AQS, Chattanooga TN
I enrolled in a workshop presented by Ruth McDowell in Lawrence Kansas in August, 2005 with four of my best quilting buddies at the time. I had already purchased a couple of Ruth’s books, and had them catalogued in my quilting library as “inspirational”. So when the girls told me about the workshop; and that there was an opening available, I was truly excited. We were to bring a picture that we would design into a quilt during the workshop. I love photography. I especially love taking pictures of my flowers and I couldn’t wait to start turning some of my photos into quilts. I spent a great deal of time going through my photos to select one. I finally decided on a picture taken on May 12, 2004 of a lavender iris of which I have hundreds of pictures, because of my fascination with its color.
Her directions were to try to develop a line drawing of our picture prior to the class. So, I printed a 5 X 7 photo. I laid a sheet of overhead sheet, that I use for my overhead projector, on top of the picture of the flower, and traced over any visible and some imaginary lines that might divide it into different fabrics for shading and included a few blades of leaves. I then projected it onto the wall to make a line drawing on tracing paper approximately 24", which was the anticipated size of my wall hanging.We were to bring a selection of fabrics, so I gathered up lots of green, lavender and some gold fabrics from my stash.
Ruth did a presentation on her methods and showed us slides of some of her work the first evening. The next day, she went around the room looking at the participants’ photos, showing those without a line drawing how to get started, making suggestions to some, and telling others what to do next. She approved my drawing, and I was ready for the first step, which was to use colored pencils to mark the sewing sections and to label each piece to indicate the sewing order on my master drawing. Next, we were to make a sewing order list. Doing that made me realize I had LOTS of sewing to do.
Ruth okayed my numbering and told me to go to the office store next door and have it enlarged. She said the curved lines would be easier to sew if they were larger. I did so, with some of the participants encouraging me to make it larger and then larger again. I took all three sizes back to the classroom with Ruth and other members selecting the largest copy as the best to use. Well, I’m not a “big, showy” kind of person and I didn’t agree. I wanted a little wall hanging, but I very hesitantly went with the group decision. The next step was to make a copy on the shiny side of the freezer paper using an Ultrafine Sharpie. I had to, of course, due to the size, tape together sheets with masking tape on the dull side. The next step was to add tick marks on the dull side of the freezer paper to help in matching the seams during piecing. Then we had to label the pieces on the dull side with the section numbers to keep track of the individual template. The next step was the BEST part – auditioning fabrics by folding and placing on the drawing,
Once you have a feel for the fabrics you want, you iron (cotton/steam) freezer paper to the wrong side of the selected fabric. Then cut out around it with a ¼” seam allowance.
There was a store across the street from the workshop called Sarah’s. Whenever, we were stymied in our fabric selection, Ruth would tell us it was time to “go shopping.” You would see ladies throughout the days, stop working on the project, leave, and come back with a bag of new fabric. I was able to find just the right fabric for my leaves at Sarah’s, and some for the borders, as I did not know what I wanted to do for a border when I gathered up my fabrics to take with me. I decided that my border should pull out the orange or root beer color of the center of my flower. Ruth uses what I call “wild” fabrics in her quilts. Since my wall hanging was intended to realistically “represent” my iris, I used the border to add a milder version of Ruth’s choice of “wild” fabrics and to spice it up a bit. This was to honor Ruth’s abilities to “pull it together wildly.”
It took me nine months to finish the quilt while working on the quilt, off and on, mostly off. I made several changes in the background choices, and in the border by pulling off the fabric from the wax paper, and re-ironing it to the “new” fabric of choice. This was very difficult for me, as I find it hard to “cut” into a fabric and by doing this I had to cut into two different fabrics. Also, I was fairly new to quilting, and didn’t have a large stash. I had to keep telling myself that this is what my stash is for, and that I’d save that discarded piece, and it’d find a home in another project someday. LOL
I was very impressed with Ruth’s ability to help ladies “design” from their pictures. She was so quick to come up with ideas for design. I learned a lot, by listening to her discuss design problems with students. I was also impressed with her ability to help others choose colors and fabrics. She has a very good eye for this.
I started to quilt it after the first nine months. I made a copy of a flower in the fabric of the border, enlarged it and quilted it in the background as my motif. I did not like the quilting I had done on the pedals, however. It sat for eight years because I HATE to take out stitches and I couldn't decide how to quilt the pedals. I always had it out on the couch to look at and contemplate, finally removing the stitching. I free-motioned quilted it as I had finally envisioned and had it done in time to use at a PowerPoint presentation and show and tell of my quilts in 2014. Without that push of finishing for the presentation, it might still be unfinished.
Shows
"Lovely Lavender Iris," juried into AQS, Dayton Beach FL, Feb.24-27, 2016
"Lovely Lavender Iris," juried into AQS, Chattanooga TN, Sept.16-19, 2015